
On the ferry to Watsons Bay

The view from Hornby Lighthouse
On the ferry to Watsons Bay
The view from Hornby Lighthouse
When you’re messing with Python 3.7’s asyncio.Task and cancellation, you might come across a weird Exception in your main loop like this:
Traceback (most recent call last):
  File "/scratch.py", line 16, in
    asyncio.run(main())
  File "/usr/lib64/python3.7/asyncio/runners.py", line 43, in run
    return loop.run_until_complete(main)
  File "/usr/lib64/python3.7/asyncio/base_events.py", line 584, in run_until_complete
    return future.result()
concurrent.futures._base.CancelledError
The example code I used to generate that exception is:
import asyncio

async def a():
    asyncio.current_task().cancel()
    await asyncio.sleep(0)
    # Upon return of control, CancelledError is injected here

async def main():
    t = [a(), a()]
    await asyncio.gather(*t)

asyncio.run(main())
As you can see, we have a list of asyncio.Task that we asyncio.gather(). The intention of this code is for a coroutine to cancel itself such that the awaiter (whoever called asyncio.gather()) can find out whether the asyncio.Task completed successfully or was cancelled.
The reason this snippet of code does not work is because by default, neither asyncio.gather() nor asyncio.Task will catch CancelledError for you. This means that once all the asyncio.gather() awaitables have completed, then you’ll get the first error that occurred, in this case the CancelledError.
The moral of the story is, don’t raise CancelledError within an awaitable. asyncio.Task.cancel() is supposed to be used to inject a termination into an asyncio function, not to be used within it.
If you have to do it, then you better either use return_exceptions=True or use a wrapper to try-catch the CancelledError.
This post is about the things I learnt in the first Face-to-Face session of FULT1901 (Foundations of University Learning and Teaching) 2019 Term 1.
Photo from the first FULT1901 Face-to-Face Session. Most people were well into their careers and I was the odd one out! Tea was provided. People pixelated for privacy.
Basically a pseudo-course (no UoC, it’s part of staff training) provided to UNSW teaching staff on how to effectively teach. It seems to be available to casual tutors even those who are still undergraduates since they enrolled me 😀
There are different approaches to how students choose to absorb the content for future usage.
The deep approach is where the student attempts to understand on an intuitive level, contemplating the ideas and material in an effort to reach that understanding.
For example, some students watch lectures to understand the concept, without caring to take notes.
The surface approach is where the student attempts to remember the content for future application e.g. an assessment task, and does not plan to retain the information beyond that.
For example, some students remember just enough content to write under each memorised heading.
Wasn’t really talked about, but it’s when a student picks and chooses to apply the different approaches to different tasks of learning at hand strategically.
An undergraduate student panel talked about their experiences and answered some questions. (Was a bit awkward since I was also a student but among lecturers)
Things students liked:
They got us to write a Teaching Philosophy Statement, which is useful for promotions and for joining teaching societies and also for promotions. Did I mention they’re good for promotions yet? (Not that it matters to me…)
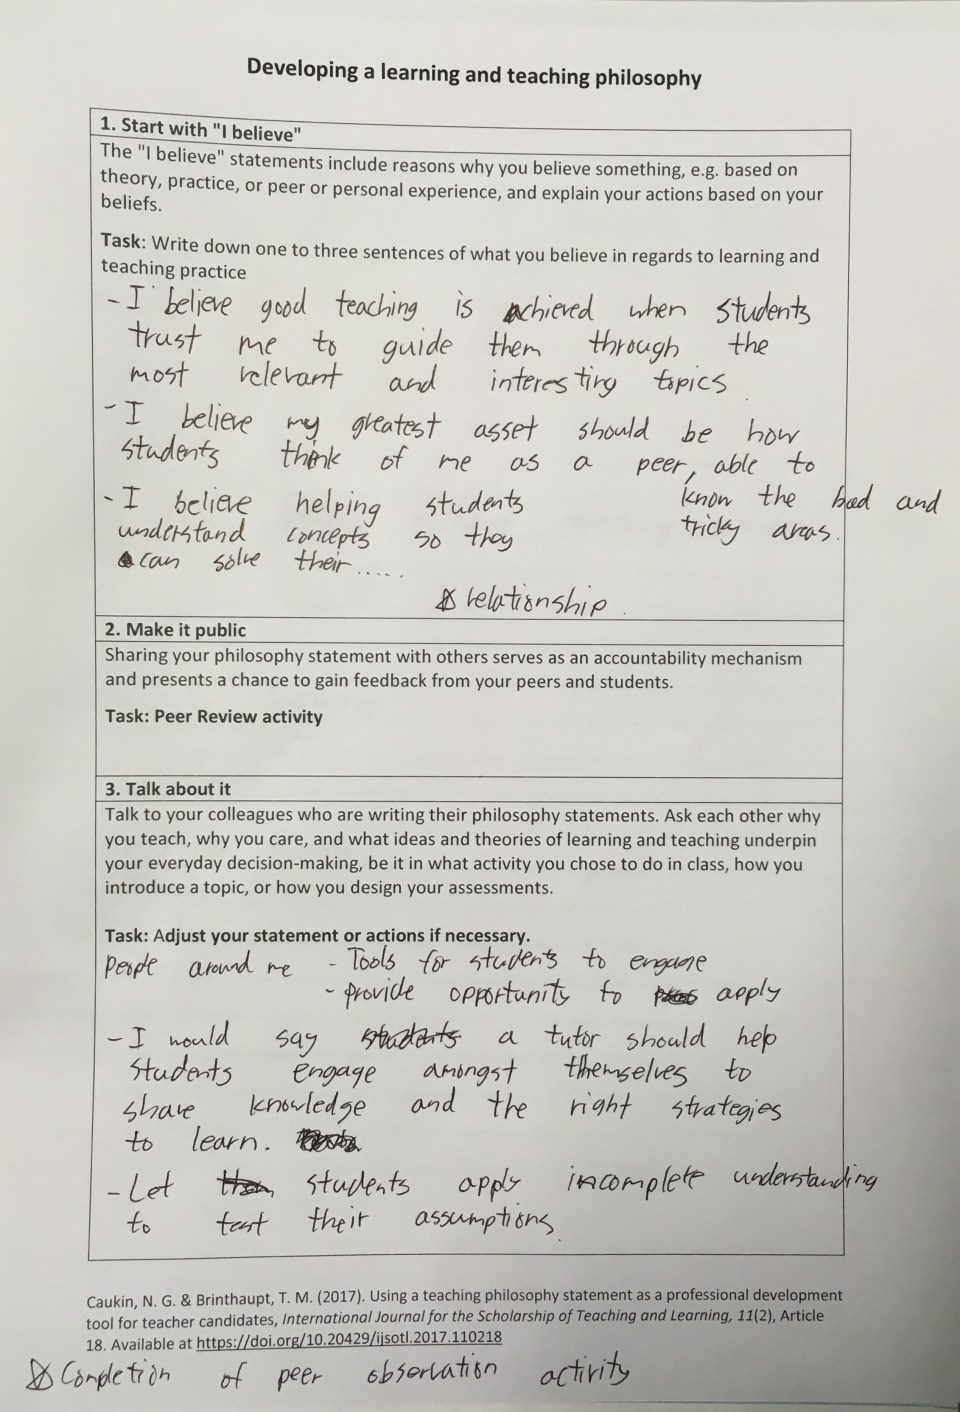
My teaching philosophy statement, which I got only 7 minutes to write. There was a discussion exercise afterwards.
This teaching philosophy statement will need to be expanded and then researched & sourced into a 500 word essay, due in a few weeks! Haven’t written a proper essay since high school, so it’ll be fun times…
sudo zypper dup estimated to download and upgrade about 1.4GiB of packages, suddenly Konsole and KDE apps crashed during the installation stage.2.0. Inspecting the system, I noticed that df -h / reported 100% disk usage.
2.1. Worried of system corruption, I immediately ran sync and force-shutdown the system.
Inspecting the system, I noticed that df -h / reported close to full disk usage. Presumably, the space was exhausted when running the system upgrade.
sudo df -h /
Filesystem Size Used Avail Use% Mounted on
/dev/mapper/cr_sda2 40G 37G 3.1G 93% /
du -shx / which only reported 1/4 the disk usage.sudo du -xhs / 9.3G /
I then did some research, and realised that btrfs subvolumes act like a “tree of filesystems”, which du -x does not cross. For example, under btrfs, / and /var may be under different filesystems under the UNIX view, yet still belong to the same filesystem under btrfs as different “subvolumes”.
See: https://btrfs.wiki.kernel.org/index.php/SysadminGuide
“A btrfs subvolume is an independently mountable POSIX filetree” … “Most other POSIX filesystems have a single mountable root, btrfs has an independent mountale root for the volume (top level subvolume) and for each subvolume; a btrfs volume can contain more than a single filetree, it can contain a forest of filetrees.”
df -h which listed different “subvolumes” of the root “volume”, all listing the same usage of the root “volume”. I had always suspected this was weird, but never realised what this meant until now.This also explains why btrfs filesystem usage didn’t show anything to contradict df -h /
Filesystem Size Used Avail Use% Mounted on
...
/dev/mapper/cr_sda2 40G 37G 3.1G 93% /
/dev/mapper/cr_sda2 40G 37G 3.1G 93% /opt
/dev/mapper/cr_sda2 40G 37G 3.1G 93% /usr/local
/dev/mapper/cr_sda2 40G 37G 3.1G 93% /srv
/dev/mapper/cr_sda2 40G 37G 3.1G 93% /.snapshots
/dev/mapper/cr_sda2 40G 37G 3.1G 93% /boot/grub2/x86_64-efi
/dev/mapper/cr_sda2 40G 37G 3.1G 93% /boot/grub2/i386-pc
/dev/mapper/cr_sda2 40G 37G 3.1G 93% /var
/dev/mapper/cr_sda2 40G 37G 3.1G 93% /tmp
...
du -shx on the different “subvolume” mountpoints, but then ran du -sh instead after realising that these mountpoints may contain more subvolumes themselves, for example the /.snapshots mountpoint.From the output, the /.snapshots mountpoint seemed most suspicious at 64G of usage compared to 4.9G of /var
From this, I suspected that a possible reason for space exhaustion is because of accumulated total change in my system makes deduplication ineffective, forcing btrfs to store multiple copies of system libraries.
btrfs has no native mechanism to track unique block use by subvolumes. Instead, it uses a “quota” sub-system. The “quota” in this case does not refer to the normal quotas applied to UNIX users. Instead, it refers to btrfs’ internal “quota” that different subvolumes can take up.
Thus, in order to track actual space used by subvolumes, one must go through this “quota” system, even when you have no intention to restrict subvolume space usage. You must enable the “quota” system to see space usage by subvolumes.
I ran btrfs quota enable to enable the quota feature, and then ran btrfs qgroup show / to list the space usage for subvolumes under the root filesystem “volume”.
Thankfully, my installation was recent enough to automatically keep track of “quota groups” from the beginning, and I didn’t need to scan anything.
See: https://lwn.net/Articles/579009/
btrfs qgroup show /
qgroupid rfer excl
-------- ---- ----
0/5 16.00KiB 16.00KiB
0/257 16.00KiB 16.00KiB
0/258 6.12GiB 6.12GiB
0/259 5.62MiB 5.62MiB
0/260 2.78GiB 2.78GiB
0/261 16.00KiB 16.00KiB
0/262 72.27MiB 72.27MiB
0/263 3.50MiB 3.50MiB
0/264 16.00KiB 16.00KiB
0/265 4.64MiB 4.64MiB
0/536 7.67GiB 7.56GiB
0/946 9.62GiB 4.68GiB
0/1334 8.91GiB 17.84MiB
0/1339 8.91GiB 15.99MiB
0/1341 9.60GiB 196.58MiB
0/1350 9.01GiB 16.00KiB
0/1357 9.01GiB 16.00KiB
snapper setup-quota.Even without running that command, I could now see the space usage of snapshots under snapper list so I assume that setup-quota does the same thing I did by enabling quota manually.
From here, correlating btrfs qgroup show / with btrfs subvolume list /, I could see /tmp taking up 2G and the easiest way to get the system online. Using ncdu, I deleted the largest files.
I then ran df -h / again to check that space had been freed up. 5.5G is larger than the initial 3.1G available.
df -h /
Filesystem Size Used Avail Use% Mounted on
/dev/mapper/cr_sda2 40G 34G 5.5G 87% /
snapper rollback to restore to the system prior to the upgrade.Because of the Copy-on-Write nature of btrfs, I must make sure I have enough space for the preexisting libraries, as well as the new libraries, when doing a full system upgrade.
I must monitor the filesystem usage before upgrades, and prune snapshots and subvolumes if necessary.
There is a surprising lack of information in English on actually getting prepaid SIM cards for long-term use in Seoul, not just as a tourist.
There is a shop near Yeongdeungpo Station crossroads, next to the Olive Young shop, that handles “Mobing” prepaid SIM cards, and they have an open pricing chart.

Taken on November 2018
For me, the last KT prepaid package option with 10GB data seemed to be the best option. (“모빙 선불데이터10G” at 33000 won approx. US$30)
Google Street View of the shop: https://www.google.com/maps/@37.51662,126.9067626,3a,52.6y,28.84h,84.73t/data=!3m6!1e1!3m4!1shZ6aZXu3s2oTg8LnXe2tVg!2e0!7i13312!8i6656
In Semester 1 of 2018 I took on a job as a casual lab assistant to COMP1521 Computer Systems Fundamentals. Before applying I looked online but I couldn’t find any resource on what the experience would be like. So here it is, the guide and review to UNSW CSE Casual Tutoring.
The first step is to apply. The main pathway to applying is via the email that CSE sends out to everyone around the end of each semester. I got in without any prior tutor recommendation, but if you can get one that’s even better.

Application email that I received on December 22, 2017
In my experience, most of the tutors at CSE are actually undergraduate students themselves, especially so for the first year courses. This is pretty unique in UNSW since other faculties’ tutors tend to be professionals or postgraduates. Whatever the reason, this means there’s plenty of opportunities for student-tutors in CSE.
The application form itself isn’t very long. Here are some of the questions and what I wrote.
Work and teaching experiences and skills
First it asks for your work and teaching experience. I wrote down PHP contracting as my work experience, making sure to focus on the communication aspects like extracting requirements. It was brief, around two sentences.
Then for the teaching skills, I put down my experience tutoring for the NCSS Challenge in 2017. A specific teaching skill I wrote down is how I was taught to make sure the students enjoy the feeling of discovery, instead of telling them step-by-step. For example, I had a student with Python code that printed out lists of strings with boilerplate (with brackets and quotes) when she didn’t want them. Instead of telling her where to fix her code, I showed her a snippet of the join function. A while later, she had figured it out herself.
If you’ve been through your first semester of computing at UNSW, you should pretty much have an idea of what a tutor or lab assistant does so write here what you think is relevant. You’re kind of expected to hit the ground running, so some practice with teaching definitely helps.

Video demonstration of communication skills
The next part is a short video “interview” to demonstrate yourself. I think it’s best to be brief like they tell you, since I doubt lecturers want to spend 10 minutes looking at your (presumably) amateur production on topics they already know.
Since I was interested in COMP1521 the most, the topic for my video was the LRU cache eviction policy. I thought of using a whiteboard to explain things, but I didn’t think they wanted a detailed explanation so I didn’t use any writing implements.
For language proficiency, I wrote down COMP1511 experience for C and open source experience for Python and others in brief sentences.
Course preferences
You get a choice of which courses you’d like to tutor. I put them in the order of my grades in the courses.
I’m not sure how strict they are on grades. But like they say, you probably need good grades unless you’ve been recommended by a tutor. Personally I felt confident because I got above 90 marks for COMP1521. After all, you need to understand the content if you want to tutor.
Success!
I submitted my application later than I should’ve, but I received my response on February 19, 2018. It was pretty close to start of the semester, so don’t fret if you don’t hear from them for a while.
If you get accepted, there is a training workshop / induction day for first time tutors run by Richard Buckland. They really drill into your head that being friendly is the most important thing for teaching outcomes. Apparently from myExperience survey responses, the keyword most correlated with successful outcomes was “friendly”.
If you’re a first time casual academic, they assign you to be a lab assistant first before you move onto becoming a tutor. Since this was my first time, I was assigned to one class as a lab assistant and later an additional help consultation session.
In addition to the hours allocated to you for demonstrating, CSE allocates you an extra hour per week for preparation. I used this time to re-do the labs and refresh my memory from lecture notes. I would recommend doing the labs again since it’s much easier to answer questions and catch bugs if you know what your students would be trying to do, and you have all the steps, quirks and shortcuts close in your mind.
As a lab assistant, my job was primarily answering questions.
One thing I noticed was that there’s very little direction given to you. Apart from the initial 2-hour induction, there was little feedback and little resources on learning to educate. And the tutors are not professional educators themselves, so they can’t really properly mentor you on how to do your job.
I also worked as a tutor in 18s2, but I’ll write about that along with reflections and resources and guides for new tutors, some other time…
Here is the menu of The Baxter Inn, a cosy and hidden whisky bar in Sydney (with free pretzels!). I took these on March 2018 but didn’t get around to posting them until now. Highly recommended with great atmosphere! Although prices aren’t cheap…


Some time in December 2018, people on xda-developers managed to root the Sony DPT-RP1 e-reader. So I wanted to understand how they discovered it, and how the exploit works.
The first step of the exploit is to flash the device with two (bogus) firmware updates. According to exploit instructions, we are supposed to use a Python program to flash two bogus firmware updates, which are supposed to fail.
It seems like a parsing vulnerability, How does that work, and how does it get past the firmware digest verification?
The DPT update package has the following format, reverse engineered from start_eufwupdater.sh
| Offset (incl-incl) | Purpose |
|---|---|
| 0x00-0x03 | “DPU8” (Digital Paper Update) |
| 0x04-0x07 | DATA_OFFSET (e.g. ” 568″) |
| 0x08-0x0b | BODY_SIZE (e.g. ” 232976″) |
| 0x0c-0x0f | ???? |
| 0x14-0x113 | Signature (size: 256) |
| 0x114-0x117 | ENC_KEY_SIZE (4 bytes e.g. 256) |
| 0x118-0x217 | AES256_KEY |
| 0x218-0x237 | IV |
| 0x238- | Data content |
Let’s diff the two pkg files and see where the update script treats them differently. We’ll run through the dd commands in start_eufwupdater.sh, and see where the outputs start to differ.
$ DATA_OFFSET=`dd if=FactoryReset.pkg bs=4 skip=1 count=1 2>/dev/null | od -A n -t d4 -v`
$ echo "$DATA_OFFSET"
         568
$ DATA_OFFSET=`dd if=JB.pkg bs=4 skip=1 count=1 2>/dev/null | od -A n -t d4 -v`
$ echo "$DATA_OFFSET"
         568
$ BODY_SIZE=`dd if=FactoryReset.pkg bs=4 skip=2 count=1 2>/dev/null | od -A n -t d4 -v`
$ echo "$BODY_SIZE"
      232976
$ BODY_SIZE=`dd if=JB.pkg bs=4 skip=2 count=1 2>/dev/null | od -A n -t d4 -v`
$ echo "$BODY_SIZE"
      232976
$ SIG_SIZE=`dd if=FactoryReset.pkg bs=4 skip=4 count=1 2>/dev/null | od -A n -t d4 -v`
$ SIG_SIZE=`dd if=JB^Ckg bs=4 skip=4 count=1 2>/dev/null | od -A n -t d4 -v`
$ echo "$SIG_SIZE"
         256
$ SIG_SIZE=`dd if=JB.pkg bs=4 skip=4 count=1 2>/dev/null | od -A n -t d4 -v`
$ echo "$SIG_SIZE"
         256
$ dd if=FactoryReset.pkg bs=1 skip=20 count=$(($SIG_SIZE)) 2>/dev/null | md5sum
f89f0c9059c5f7e06357b33910a18af9  -
$ dd if=JB.pkg bs=1 skip=20 count=$(($SIG_SIZE)) 2>/dev/null | md5sum
f89f0c9059c5f7e06357b33910a18af9  -
$ dd if=FactoryReset.pkg bs=$(($DATA_OFFSET)) skip=1 2>/dev/null | head -c $(($BODY_SIZE)) | md5sum
a2d4d32d98f96242b83b8621616abfb1  -
$ dd if=JB.pkg bs=$(($DATA_OFFSET)) skip=1 2>/dev/null | head -c $(($BODY_SIZE)) | md5sum
a2d4d32d98f96242b83b8621616abfb1  -
$ ENC_KEY_SIZE=`dd if=FactoryReset.pkg bs=1 skip=${ENC_KEY_OFFSET} count=4 2>/dev/null | od -A n -t d4 -v`
$ echo "$ENC_KEY_SIZE"
         256
$ ENC_KEY_SIZE=`dd if=JB.pkg bs=1 skip=${ENC_KEY_OFFSET} count=4 2>/dev/null | od -A n -t d4 -v`
$ echo "$ENC_KEY_SIZE"
         256
$ dd if=FactoryReset.pkg bs=1 skip=${ENC_KEY_OFFSET} count=$(($ENC_KEY_SIZE)) 2>/dev/null | md5sum
cac05d9116db1420e21f379d88939274  -
$ dd if=JB.pkg bs=1 skip=${ENC_KEY_OFFSET} count=$(($ENC_KEY_SIZE)) 2>/dev/null | md5sum
f02f33824e15d65cfdaf208606793fc1  -
Here we see that the only difference between FactoryReset.pkg and JB.pkg is the encryption key.
The DPT update package embeds the symmetric encryption key for the firmware, and the embedded key is encrypted again with a static symmetric decryption key stored on the device. We can change the encryption key by encrypting the desired plaintext with the leaked static decryption key.
To figure out why JB.pkg’s encryption key is special, I decrypted it, and found this:
00000000: ZGFlbW9uOng6MTox
00000010: OjovdXNyL3NiaW46
00000020: L2Jpbi9mYWxzZQpu
00000030: b2JvZH -k.6eDo2N
00000040: TUzNDo2NTUzNDo6L
00000050: 25vbmV4aXN0ZW50O
00000060: i9iaW4vZmFsc2UKc
00000070: m9vdDo -k.MSQxJE
00000080: FlZ2VZbTFRYWFUeW
00000090: QvMWZPaVhWZDA6MD
000000a0: owOjovcm9vdDovYm
000000b0: luL3NoCg== -none
000000c0:  -in /tmp/aes256
000000d0: .key -out /etc/p
000000e0: asswd -a
It’s obvious that this is a shell injection vulnerability.
Looking at the start_eufwupdater.sh:
openssl enc -d -aes-256-cbc -K `cat ${AES256_KEY}` -iv `cat ${IV}`
Because we have control of the AES256_KEY, and it’s never digest verified (only the firmware data is verified), we can inject any arguments we want.
The very first sign of useful information seems to have come when someone acquired a Chinese-rooted DPT-RP1 device, and extracted the firmware update mechanism and published it.
It seems someone rooted a copy of the device using hardware methods, and extracted the FactoryReset.pkg along with keys used to verify and decrypt the package.
This shows the value of hardware hacking, even when trying to develop software exploits.
https://forum.xda-developers.com/showpost.php?p=78140924&postcount=68
https://github.com/octavianx/Unpack-and-rebuild-the-DPT-RP1-upgrade-firmware
When you first install openSUSE Tumbleweed and try to view Korean characters, you’ll find that they’re very ugly. That’s because they’re characters from the GNU Unifont typeface which doesn’t have any focus on looking nice.
To get good looking Korean types, I did the following:
Now you should have nice looking Korean types everywhere on openSUSE Tumbleweed.
I tried to use Korean keyboard input, but it seems multilingual input isn’t as easy on openSUSE as it is on Ubuntu. I expected to simply add Korean to the list of keyboards, and have everything work out of the box.
Weirdly enough, adding “Korean” to KDE’s keyboard settings Search -> “Keyboard” -> “Layouts” -> Add Korean didn’t do anything. I couldn’t type Korean and the keyboard still only showed English characters.
So I tracked it down, and turns out the KDE Keyboard “Layouts” feature doesn’t do anything?! It’s supposed to integrate with one of many input methods like ibus and fcitx.
Well I couldn’t be bothered dealing with incomplete integration, so I just decided to install ibus raw since I don’t write Korean often anyway.
Unfortunately, I ran into a breaking bug where the IBus notification panel would pop up randomly occasionally. Because of that, I switched to fcitx.
1. Reset KDE “Keyboard” layout settings, particularly clear the keyboard layouts.
(It won’t have any effect. Basically, they expect distros to do communication between their settings, and Input Methods like fcitx. openSUSE doesn’t seem to have a complete implementation, so I won’t bother with it. If you add a layout here, it seems all it’ll do is add another confusing layout indicator that doesn’t work besides fcitx’s own.)
2. Install fcitx fcitx-hangul kf5-kcm-fcitx
3. Go to fcitx configuration
4. As “Current Input Method”, set “Keyboard – English (US)” and “Hangul”. You might like to disable “Only show current language” checkbox to search for Hangul.
5. Enter the following into your ~/.xprofile
export GTK_IM_MODULE="fcitx"
export QT_IM_MODULE="fcitx"
export XMODIFIERS="@im=fcitx"
6. Restart your system to effect changes for the entire system.
That’s it! Now you can use “Ctrl-Space” to switch between the two inputs. It also autostarts on boot automatically without me doing anything special.
For reference, the default values for IM environmental variables on openSUSE Tumbleweed (2018-11-22) are:
> echo "$GTK_IM_MODULE"
cedilla
> echo "$QT_IM_MODULE"
xim
> echo "$XMODIFIERS"
@im=local
Reference on input environmental variables: https://unix.stackexchange.com/questions/260601/understanding-setting-up-different-input-methods
Reference on KDE Input Methods, and future direction: https://mail.kde.org/pipermail/plasma-devel/2017-April/068978.html
